


This Scanner Dashboard uses the Extreme TMA System Arrows index to show decent purchase/SELL signals.
Download extras here:
https://abiroid.com/extras/tma-scanner-and-arrows-indicator-extras
This item includes dashboard only. It does not contain the Abiroid_Arrow_Extreme_TMA.ex4 indicator.
Arrows indicator is not necessary for dashboard to work.
This item includes dashboard only. It does not contain the Abiroid_Arrow_Extreme_TMA.ex4 indicator.
Arrows indicator is not necessary for dashboard to work.
To find arrows, you can buy the arrows indicator separately if you prefer:
https://www.mql5.com/en/market/product/44822
Read comprehensive description:
https://abiroid.com/extras/tma-scanner-and-arrows-indicator-extras
[spoiler title=”Read More…”]
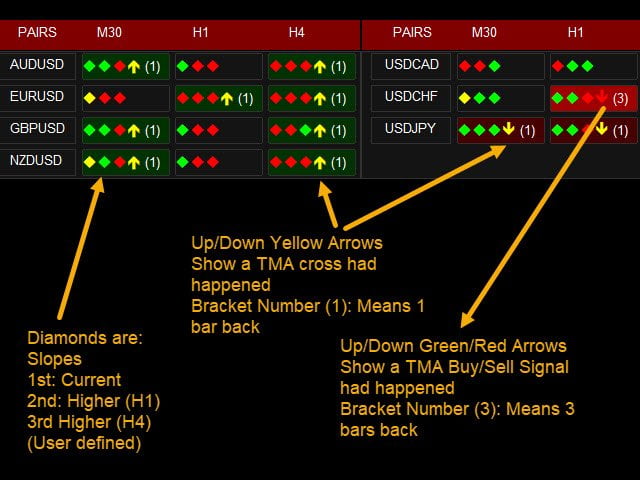
Dash shows Slopes for present and greater Timeframes.
- 1st diamond is current TF. Next diamonds are high TFs
(Please notice : Slope Calculation uses ATR and TMA for several past bars. So, having too many slopes for many pairs and timeframes might make dashboard slow.
e.g: Having 4 slopes for 28 pairs for 4 TFs will make dashboard load in about 30-40 seconds depending on your PC.)
(Please notice : Slope Calculation uses ATR and TMA for several past bars. So, having too many slopes for many pairs and timeframes might make dashboard slow.
e.g: Having 4 slopes for 28 pairs for 4 TFs will make dashboard load in about 30-40 seconds depending on your PC.)
- Last Arrow is TMA Signal:
Yellow arrow: Price Crossed up or down TMA band
Red/Green arrow: price reversing making lower lows (SELL) or higher highs (BUY) from previous bar
- Bracket shows number of bars back where Signal happened.
BG Dark Green: price below lower band and reversing.
BG Dark Red: price above upper band and reversing.
When BUY/SELL signal occurs, block turns Green/Red.
Video tutorial for both indicators:
– If useHeikenAshiPrice is true – use Heiken prices
- If Price has crossed Upper/Lower bands
- If useRSI is true and Price OverBought/OverSold
- If checkCurrentTFSlope or checkHTFSlope – do a Slope Check as described in next section
- If “Ignore If TakeProfit Too Close” is true – and price less than “Min Distance from TakeProfit” percentage.
If all conditions match, get a BUY or SELL Signal and Alert. BUY is Green BG. SELL is Red BG.
Channels Check:
TMATrue (Non-repaint)
FastLineTMA (Repaints) From original Extreme TMA Strategy
TMA CG (Repaints)
TMA CG is a bit slower than others – so might take longer to load when using multiple pairs/timeframes
TMA CG is a bit slower than others – so might take longer to load when using multiple pairs/timeframes
Slope Check:
Options:
Slope1 (repaints)
Slope2 (Non-repaint)
If SlopeThreshold is 0.3.
- Slope < -0.3 means Bearish. Show only SELL Signals.
- Slope > 0.3 means Bullish. Show only BUY Signals.
- Slope between -0.3 and 0.3 means Market is Ranging. Show both BUY and SELL Signals
- MinDistance is 0.3 means 30%
- 100% distance is between Upper/Lower band and Middle band.
- Distance between Upper/Lower band and starting price is already more than 30% then ignore the signal.
Read Detailed dashboard settings here:
https://abiroid.com/indicators/abiroid-scanner-dashboard-common-settings
TMA Dash Settings:
Read Detailed dashboard settings here:
https://abiroid.com/indicators/abiroid-scanner-dashboard-common-settings
TMA Dash Settings:
Read Detailed dashboard settings here:
https://abiroid.com/indicators/abiroid-scanner-dashboard-common-settings
TMA Dash Settings:
- TMA_Period = 50 (Triangular Moving Average Period)
- ATR_Period = 100
- ATR Multiplier or Bands Deviation (move channels closer or further)
- checkHTFSlope = false (Check Slopes for next 3 Higher TF)
- checkCurrentTFSlope = true (Check slope for Current TF)
- ignoreMNSlope = true (Ignore Monthly slope or not)
- TMA_SlopeThreshold = 0.3 (Slope Threshold for Checking Bullish/Bearish)
- useRSI = false (If Use RSI true – only trade BUY if RSI OverSold and SELL if RSI OverBought)
- RSI_Period = 14
- RSI_OversoldLevel = 30
- RSI_OverboughtLevel = 70
- ignoreTooCloseMiddleBand = true (TakeProfit will be somewhere close to Middle Band. Price reached too close to middle band – ignore signal)
- minDistFromMiddleBand = 0.3 (0.3 means 30% distance from Middle Band. If ignoreTooCloseMiddleBand true and price reaches more than 30% distance from middle band then ignore signal)
- Past Bars Search For TMA Signal: Past bars for TMA Cross or Up/Down Signal
- “Do Past Arrow Search At Start” if true, it will look at specified PastBars when dash first loads and will show which arrow was last. If false, it will only study new bars and update arrow values in brackets as and when they occur.
If “Do Past Arrow Search At Start” true and “Past Bars Search For TMA Signal” is a high number can slow down the dashboard.
Suggestion: If you want to look at a lot of past bars, keep this false. And only look for new bars.
If “Do Past Arrow Search At Start” true and “Past Bars Search For TMA Signal” is a high number can slow down the dashboard.
Suggestion: If you want to look at a lot of past bars, keep this false. And only look for new bars.
Arrow (number): No of bars back a cross had occurred.
Arrow ( ): price is still outside the TMA bands. So lookback further.
[/spoiler]