


Renko charts are based cost motion tracking. when the price goes beyond a certain range, the graph reveals a bar (“brick”) over or below the preceding one. As a result, we can certainly see the price movement and important support/immunity levels. Since the classic Renko graph does not depend on time, it’s quite tough to use it jointly along with additional technical indicators. This is particularly true for analyzing your plan on history. it’s to overcome this annoyance that the Smart Renko Chart was developed. in addition, Smart Renko has other advantages.
- The Renko calculation is performed on any timeframe, including M1 and M5.
- Shows the trends on all time frames.
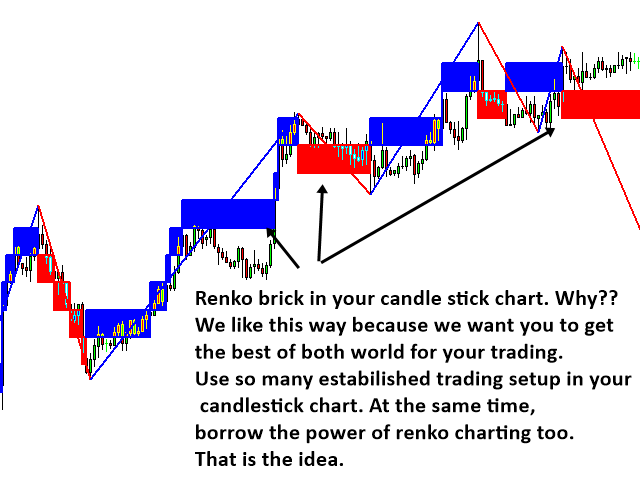
- The ability to display Renko on the main chart for back testing with other technical indicators.
- The ability to find matches between Renko charts on the price chart and in a separate window. (Just double-click on the price chart or the indicator window. You will see the corresponding lines on both graphs).
- Automatic calculation of the range using the standard deviation and the Z value. Therefore, the indicator is also suitable for beginners.
- Displays the future levels of bricks to buy and sell.
- Smart Renko should be used together with other indicators, for example, MACD, RSI, Stochastic, Moving averages.
- Smart Renko is recommended for use on a line chart. By default, the indicator works on it. However, you can switch to the candlestick chart.
- Renko should be calculated on the data of the M1 graph. You can choose the M1 timeframe to calculate with the Smart Renko indicator. However, most brokers do not have enough historical data for this timeframe. So the default is M5.
- You can display the bricks for the entire length of the historical data. However, this may reduce the speed of the terminal.
- With Brick Height Mode = 1, Smart Renko uses the standard deviation to automatically calculate the range. Choose the Z value wisely (1.0, 1.68, 1.96, etc.). The effectiveness of the indicator depends on it.
- When For Brick Height Mode = 0, you define the range value in pips. Smart Renko uses your input data to build a Renko graph.
- Press R if Smart Renko does not load automatically at startup. This may happen due to loading the source data on an additional timeframe (M1, M5, etc.).
- An additional timeframe (M1 or M5) is used to calculate the bricks and display them on the current timeframe. Do not use a weekly or monthly schedule. Usually, there is not enough data on M1 and M5 to display Renko on weekly and monthly charts.
[spoiler title=”Read More…”]
Smart Renko can be used for different purposes. In the simplest case, it can be used as a confirmation indicator when determining the direction of the current or future trend. It also helps to identify important support/resistance lines, making it better compared to Japanese candlesticks, range bars, etc. Usually, when working with standard Renko charts, traders need to use different indicators in separate windows in parallel. There’s no need for that now. It is enough to use the combined display of the Renko bricks with the price chart, as well as all the necessary standard indicators of MetaTrader. The main working principle of the Renko chart is based on price action. Accordingly, the indicator is best suited for trading strategies that are also based on price action. The Smart Renko Chart indicator works well in combination with our other products:
- Harmonic Pattern Plus MT4
- Harmonic Pattern Scenario Planner MT4
- Price breakout Pattern Scanner MT4
- Sideways Market Statistical Analyzer MT4
- Price Action Candle Detector MT4
- TM Econometric Trader MT4
[/spoiler]