


As an EA, it uses the techniques we usually employ in trading like determining the highs and lows on the trading chart. With this, it determines the trend convergence and divergence in the chart. Combined with the volatility, price movements, it analyzes the possible order type that can be most profitable. By default, pending orders are executed. However, pending orders have expiration to ensure that the single order being expected is maximized and if not to generate a new order based on the trading rules available.
On the other hand, TheTrendHunter can also be used to trade manually using the signals it generates on the chart combined with the user’s personal trading strategy. TheTrendHunter makes available to the user buttons to execute orders like the Buy and Sell button for pending or market orders. The Close button can be used to terminate pending and market orders currently in the chart.
So enjoy and let us hear from you soon. Feel free to share this to your friends for FREE. Happy trading everyone.
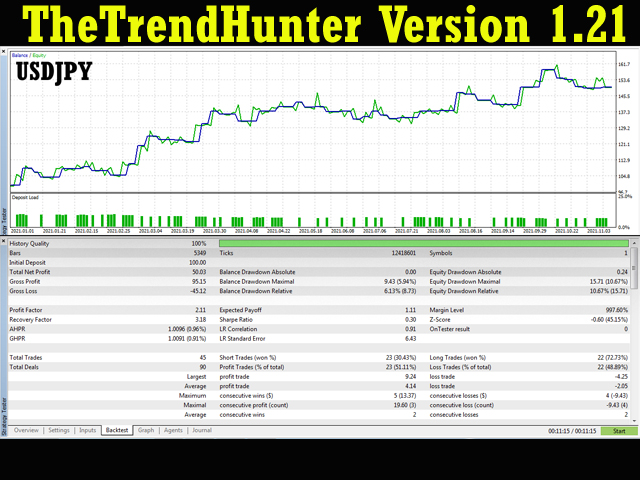
Use Preset Values – Set to TRUE to use predefined input values. These are values for some input variables that have been found to be effective in backtesting AUDUSD, USDJPY, and USDCAD currency pairs. The preset values are for the following input variables.
- Enable Trade Window
- Auto SL-TP
- SL on Trend
- Auto Risk
- Order Type
- Enable Trailing SL
- Auto Offset
- Halt On Breakeven
- Auto Close
[spoiler title=”Read More…”]
Use Preset Values – Set to TRUE to use predefined input values. These are values for some input variables that have been found to be effective in backtesting AUDUSD, USDJPY, and USDCAD currency pairs. The preset values are for the following input variables.
1. Enable Trade Window – limit trade to specific time only.
2. Trade Start – beginning of time window.
3. Trade End – end of time window.
1. Volume (lot)) – manual setting of lot size.
2. Stoploss (pip) – manual setting stoploss distance from order price.
3. Takeprofit (pip) – manual setting of takeprofit distance from order price.
4. Auto SL-TP – automatic generation of stoploss and take profit based on trend volatility.
5. Auto TP Multiplier – value multiplied to current volatility to generate TP.
6. Auto SL Multiplier – value multiplied to current volatility to generate SL.
7. SL On Trend – option for user to use recent High or recent Low as placement of Stoploss (SL).
1. Auto Risk – enable/disable automatic generation of SL, TP, and volume.
2. Risk Value (%) – percent risk on equity used to auto generate risk values.
1. Order Type – choose between market and pending of order.
2. Pending (pip) – pending distance from current market price.
3. Pending Expiration (mins) – duration of pending order before it is deleted if not triggered. As a general rule, this should be based on the 2 bars you have in your current chart. in H1 timeframe, 2 bars is equal to 120 minutes. In a 5 minute timeframe, 2 bars is equal to 10 mintes. In 1 minute timeframe, 2 bars is equal to 2 minutes, and so on.
1. Enable Trailing SL – enable/disable trailing stoploss.
2. Trailing Offset – distance in pips from the current price.
3. Auto Offset – allow determination of offset based on volatility.
4. Auto Offset Multiplier – multiplier for volatility.
5. Halt On Breakeven – allow Trailing SL up to a certain distance from the order price.
6. Breakeven – breakeven distance from the order price in pips.
1. Timeframe Execution – timeframe to be used in drawing High and Low arrows on the chart and in decision making.
2. Timeframe Reference – timeframe to be used as reference in comparison to the current timeframe
3. Auto Close – automatic closing of open order when trend weakens.
4. Auto Close Trigger – timeframe to be used in deciding for the closure of the existing orders.
5. Magicnumber – order ID used to ensure correct order manipulation. Allow simultaneous execution with other IDs.
1. Backtesting – ensure the EA is always available which is needed in backtesting. For forward testing or live trading, you can set this to false.
[/spoiler]