


Examples right away
https://gyazo.com/8179542d3b82430be4e1c715652c0b3c
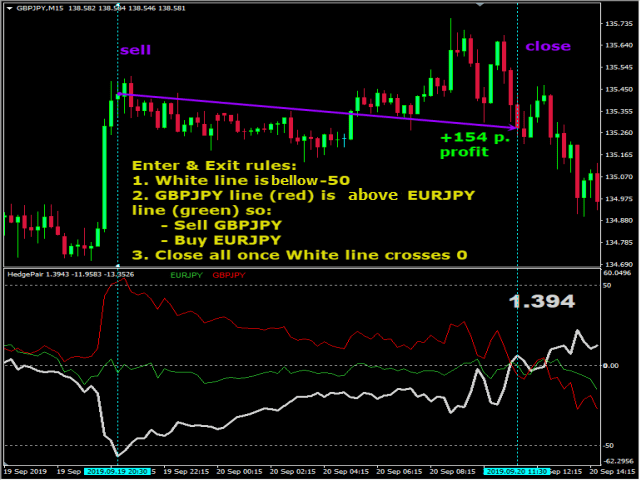
Hedge Pair
This indicator allows to observe a synthetically calculated spread between two pairs.
The main idea is to pick two pairs which have a strong and positive correlation, like EURUSD and GBPUSD, EURJPY and GBPJPY, AUDUSD and
NZDUSD etc.
NZDUSD etc.
Once the spread line (lightgray colored line by default) goes way up high or down low, you can obtain a margin from the market by entering
first pair long and second pair short or vice versae.
first pair long and second pair short or vice versae.
Exit point is when the spread line (lightgray colored line by default) reaches 0.
[spoiler title=”Read More…”]
Theory
Strong positive correlation pairs usually move together, and this indicator shows their relative movement to each other and shows the
difference (lightgray line). Ideally pairs should always move together and difference must be always at 0 value, but
practically, as you may see, there are often times when the movement is not the same.
difference (lightgray line). Ideally pairs should always move together and difference must be always at 0 value, but
practically, as you may see, there are often times when the movement is not the same.
By using this indicator you can identify the moments when the pairs have a way big difference in their movement, which gives an
opportunity to take profit.
opportunity to take profit.
Rules
You are free to make your own rules of entry and exit, the following servers as a standard exapmple:
1. When lightgray line goes above oversold (let’s say 50):
1.1. Sell first symbol
1.2. Buy second symbol
1.3. Close all when lightgray line reaches 0.
2. When lightgray line goes bellow oversold (let’s say -50):
2.1. Buy first symbol
2.2. Sell second symbol
2.3. Close all when lightgray line reaches 0.
Note
You should avoid entering during high impact news.
You should calculcate how much volume to trade.
For example the EURUSD and GBPUSD pair both have same pipcost across all brokers.
So it’s ok to trade them with same volume for EURUSD and GBPUSD, like 0.1 lot for each.
For other pairs you should calculate, you should search traders calculater for your broker and see if the chosen pairs have same
pipcost.
pipcost.
Parameters
- Limit bars – limits of how much bars the indicator must calculate
- Indicator period – a period for indicator
- Symbol 1 – First symbol
- Symbol 2 – Second symbol
- Color 1 – coloring for first symbol
- Color 2 – coloring for second symbol
- Indicator color – coloring for spread line
- Level 1 – Level 1 value
- Level 2 – Level 2 value
- Enable Alerts on levels cross – If set true, then will alert whenever level1 or level2 are crossed by indicator
- Enable Alerts on zero cross – If set true, then will alert whenever zero level is crossed by indicator
[/spoiler]