


This multi-currency expert uses 28 currency pairs. For forecasts, the Expert Advisor uses models trained by the machine learning algorithm in the Python language environment.
Signal : https://www.mql5.com/en/signals/969741
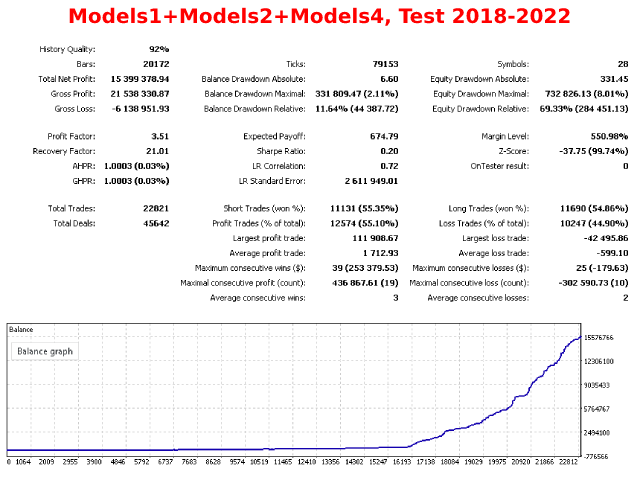
You can easily check the effectiveness of the Expert Advisor, select one of the models, for example, trained on the periods from 2018 to 2020 and check it on the periods up to 2018 or from 2020 to the current time, everywhere on the tests we get a profit. The fact that the robot does not know anything about the periods on which it was not trained and gives a significant profit on these time periods is a fairly significant sign in the effectiveness of the robot.
The big advantage of this Expert Advisor is that it can use several packages of models trained according to different criteria for each pair separately, now it is possible to choose 4 different packages of models together or separately, in the future these models will be improved and added with the next update of the Expert Advisor.
[spoiler title=”Read More…”]
The Expert Advisor can be easily and quickly optimized for the last period of real trading by simply setting these 4 packages as parameters in the optimization, and the optimizer in the strategy tester will select the most favorable combination of these packages for the last period of trading.
The Models parameter for the Bollinger Bands indicator:
Models1-trained for the time period from 2018 to 2020
Models2-trained on the time span from 2014 to 2020
Models3-trained on the time span from 2007 to 2020
Models4-trained for the time period from 2020 to 2022
The default settings are for the EURUSD H1 currency pair, and use Models1, Models2, and Models4
- Before testing in the strategy tester or installing the Expert Advisor on the chart make sure that all 28 currency pairs were visible and added to the terminal: EURUSD, EURGBP, EURCHF, EURAUD, EURCAD, EURJPY, EURNZD, GBPUSD, GBPAUD, GBPCHF, GBPJPY, GBPCAD, GBPNZD, USDCAD, USDJPY, USDCHF, AUDUSD, AUDCHF, AUDCAD, AUDJPY, AUDNZD, NZDUSD, NZDJPY, NZDCAD, NZDCHF, CADCHF, CADJPY, CHFJPY
- In the strategy tester, set the trading mode “Only opening prices“, this will not significantly affect the test results, but will significantly speed up the process.
- You can also disable the strategy tester visualization for quick testing.
- At the end of the test, in the log tab, you can view information on the yield and maximum drawdown of each pair separately
Description of some Expert Advisor settings
Description of some Expert Advisor settings
- UseSameLotSizeForAllPairs – the ability to select the lot size for each pair separately, by default true, one lot size for all specified by the parameter above
- UseMaxAllTakeProfitProcent-includes the global take profit as a percentage of the current profit specified in the MaxAllTakeProfitProcent parameter, after its execution, all current orders are closed. Test only on all ticks or 1 minute OHLC
- UseMaxStopLossProcent-enables the global stop loss as a percentage of the current profit specified in the MaxAllStopLossProcent parameter, after its execution, all current orders are closed. Test only on all ticks or 1 minute OHLC
- MaxProcentDropDown-automatic sequential closing of positions if the drawdown exceeds the percentage specified in this parameter, if 0 is specified this option is disabled by default(for example, MaxProcentDropDown = 30 means that if the drawdown exceeds 30%, positions will be gradually closed until the drawdown is less than 30%)
- IsDynamicLot-enable automatic formation of the lot size depending on the balance or free margin
- is_koef_for_each – if true, the lot size is formed from the balance for each currency pair separately, if false, from the total balance or free margin
- koef-coefficient for determining the lot size, the larger, the greater the risks
- from–forming the lot size depending on the balance or free margin
- CountOfGrid – number of pending orders in the grid
- GridDistanseBegin – start of the first pending order in the grid from the current price
- GridDistanseEnd – end of the last pending order in the grid from the current price
- GridKoefBegin, GridKoefEnd – distribution of coefficients for multiplying the price of a pending order in the grid
[/spoiler]