


Supply Demand Zone Pro Indicator works with all products and timeframes. It is using a new calculation method, and now you can select the desired zone on any timeframe! Strongest Zones are already enabled by default This is a great advantage in trading.This indicator has a built in backtester enabled by default, just move the chart.
Supply is a
price zone where sellers outnumbered buyers and drove the price
lower.
Demand is a
price zone where buyers outnumbers sellers and drove the price
higher.
Step1– Look for a strong rally. Then without warning, the price
suddenly reverses and drops FAST. That indicates
an area of major imbalance – a high-probability Supply Zone. (Vice
versa for demand zone)
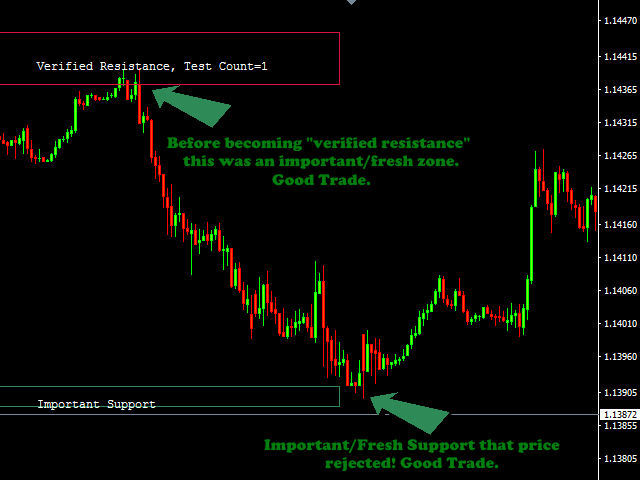
Step2 – Trade FRESH/IMPORTANT, (S/D) zones. That
means, the market price has never tested these zones before.
Note: You can try to trade using the verified zone, but pay attention to that zones.
These are the highest-probability.
TIPS:
Each time the price reaches a zone, that zone becomes
weaker and weaker.
Use the zones which were hit 0-1 times!
About Indicator:
Show Important Zone (Recommended to use it on “True”)
Show Verified Zone (Recommended to use it on “True”)
Show Turncoat Zone
Show Weak Zone
Show Possible Zone
Show Broken Zone
==========ZONE ALERTS==========
Show Zone Alerts
Popups Zone Alerts
Sound Zone Alerts
Send mail notification
Mobile Notifications
Zone Alert wait seconds
==========STYLE ZONES==========
Filter Zone (Recommended to use it on “True”)
Zone Extend
Zone Solid
==========ZONE FRACTALS==========
Zone Fuzz Factor
Fractals Show
Fractal Fast Factor
Fractal Slow Factor
==========ZONES TESTING==========
TRUE = scrolling back the chart shows PAST zone “look”
Show button to switch Testing mode On/Off
Testing Button Position X
Testing Button Position Y
[spoiler title=”Read More…”]
Step1– Look for a strong rally. Then without warning, the price
suddenly reverses and drops FAST. That indicates
an area of major imbalance – a high-probability Supply Zone. (Vice
versa for demand zone)
Step2 – Trade FRESH/IMPORTANT, (S/D) zones. That
means, the market price has never tested these zones before.
Note: You can try to trade using the verified zone, but pay attention to that zones.
These are the highest-probability.
Show Important Zone (Recommended to use it on “True”)
Show Verified Zone (Recommended to use it on “True”)
Show Turncoat Zone
Show Weak Zone
Show Possible Zone
Show Broken Zone
==========ZONE ALERTS==========
Show Zone Alerts
Popups Zone Alerts
Sound Zone Alerts
Send mail notification
Mobile Notifications
Zone Alert wait seconds
==========STYLE ZONES==========
Filter Zone (Recommended to use it on “True”)
Zone Extend
Zone Solid
==========ZONE FRACTALS==========
Zone Fuzz Factor
Fractals Show
Fractal Fast Factor
Fractal Slow Factor
==========ZONES TESTING==========
TRUE = scrolling back the chart shows PAST zone “look”
Show button to switch Testing mode On/Off
Testing Button Position X
Testing Button Position Y
[/spoiler]